Pages

.

Fast contrast adjustment using Perlin's gain function


Lena (a standard test image in the graphics programming world) is transformed by the Perlin gain function with b = 0.5, b = 0.4, and b = 0.65, respectively (left to right).

Coaxing more contrast out of an image is a kind of exercise in weak-signal detection. You're trying to make information more obvious in the presence of noise. In practice, it comes down to making light tones lighter and dark ones darker. But you have to do it carefully, in such a way as not to force too many (preferably no) dark tones into total blackness nor too many light tones into total whiteness.

A very useful approach is to adapt Ken Perlin's gain function to the remapping of pixel values. In JavaScript, the function looks like this:

var LOG_POINTFIVE = -0.6931471805599453;

function gain( a, b) {

var p = Math.log(1. - b) / LOG_POINTFIVE;

if (a < .001)
return 0.;
if (a > .999)
return 1.;
if (a < 0.5)
return Math.pow(2 * a, p) / 2;
return 1. - Math.pow(2 * (1. - a), p) / 2;
}
The Perlin gain function maps the unit interval (i.e., real numbers from 0 to 1, inclusive) onto itself in such a way that a control value of 0.5 maps [0..1] to [0..1] unchanged, whereas a control-parameter value of (say) 0.25 maps the number 0.5 to itself but maps all other values in the unit interval to new values, as shown in the figures below. (In each graph, the x- and y-axes go from zero to 1.0.)

In the function shown above, the control parameter (the formal parameter that throttles the function) is b. The input value that will be mapped to a different output is a. If b is 0.5, then the output of the function will always be a no matter what value of a you pass in. But if b is 0.25, and a is (say) .4, the function will return 0.456, whereas if b is 0.75 and a is 0.4, the output will be 0.32. In one case, a got bigger, and in the other case it got smaller. The function has the effect of making bigger values bigger and smaller values smaller when b > 0.5. It has the effect of making bigger values smaller and smaller values bigger when b < 0.5.


Gain = 0.25


Gain = 0.5


Gain = 0.75

This turns out to be a great function for changing the contrast of an image. All you have to do is re-map pixel values onto the [0..255] interval using the function, with a value for b of something greater than 0.5 if you want the image to have more contrast, or less than 0.5 if you want the image to have less contrast.

It turns out Java.awt.image has a built-in class called LookupOp that implements a lookup operation from a source color table to an output color, which makes it easy to implement extremely high performance contrast adjustment via the gain function. The red, green, and blue values in an RGB image span the interval zero to 255. All we need to do is create a byte array of length 256, containing those values, then modify the table by passing each value through the gain function. The altered table can be used to create a LookupOp instance, and then you just need to call filter() on the instance, passing it an input image and an output (holder) image.

I do all this in JavaScript in the code listing below. To run this script against an image of your choice, you simply need the (open source) ImageMunger app that I wrote about a couple days ago.

/* Contrast.js
Kas Thomas
24 Jan 2010

Public domain.

http://asserttrue.blogspot.com/
*/


// Use values >.5 but <>
// < .5 && > 0 for less contrast.
CONTRAST = .75; // Adjust to taste!

awtImage = java.awt.image;

/* Return a java.awt.image.ByteLookupTable */
function getLUT( amt ) {

var LOG_POINTFIVE = -0.6931471805599453;

function gain( a, b) {

var p = Math.log(1. - b) / LOG_POINTFIVE;

if (a < .001)
return 0.;
if (a > .999)
return 1.;
if (a < 0.5)
return Math.pow(2 * a, p) / 2;

return 1. - Math.pow(2 * (1. - a), p) / 2;
}

// Perlin's gain function
// per K. Perlin, "An Image Synthesizer,"
// Computer Graphics, v19, n3, p183-190 (1985)

/* We are going to construct a table of values,
0..255, wherein the values vary nonlinearly
according to the formula in gain(), as
throttled by the parameter 'amt' */


var tableSize = 256;
var javaArray = java.lang.reflect.Array;
var bytes =
javaArray.newInstance( java.lang.Byte.TYPE,
tableSize );
var lut = new awtImage.ByteLookupTable(0, bytes);

for (var i = 0,gainValue = 0; i < tableSize; i++) {
gainValue = gain(i / 255., amt);
var byteValue = 255 & (255. * gainValue);
if (byteValue >= 128)
byteValue = -(255 - byteValue);
bytes[i] = byteValue;
}

return lut;
}


// Create the lookup table
lut = getLUT( CONTRAST );

// Create the java.awt.image.LookupOp
lop = new awtImage.LookupOp( lut, null );

// Clone the source image
src = theImage;
clone = new awtImage.BufferedImage( src.getWidth(),
src.getHeight(), src.getType() );
g2d = clone.getGraphics();
g2d.drawImage( src, 0,0,null );

// apply the contrast
lop.filter( clone, src );

// refresh the screen
//Panel.updatePanel();
thePanel.repaint();
There are a couple of things to note. First, you can't assume that an array created in JavaScript can be used as an array in a Java context, because Java is type-fussy and JavaScript isn't, so instead, to create a Java array in JavaScript you have to do:

var bytes =
javaArray.newInstance( java.lang.Byte.TYPE,
tableSize );
This creates a Java byte array and stores a reference to it in JavaScript. But now you have another problem, which is that you can't just map values from [0..255] onto a 256-length Java byte array, because in Java, the byte type cannot accommodate values greater than 127. In other words, byte is a signed 8-bit type, and you'll get an error if you try to store a value of 128 in a byte variable. So to initialize the 256-length byte array with values from zero to 0xFF, and still keep the Java compiler happy, we have to resort to a bit of twos-complement legerdemain:

 if (byteValue >= 128)
byteValue = -(255 - byteValue);
To test the contrast.js script, I ran it against the Lena image with values for b -- in the gain function -- of 0.5 (which leaves the image unchanged), 0.4 (which reduces contrast), and 0.65 (which increases contrast). You can see the results at the top of this post. The code executes very quickly because it's all a table lookup done in Java. The JavaScript part simply initializes a (very small) table.

Projects for the future:
  • Add a UI to the program to allow contrast to be adjusted in real time with a slider.
  • When contrast is increased in a color image, hot parts of the image appear to get hotter and cold parts appear to get colder. Write a modification of the contrast code that compensates for apparent temperature changes.
  • In the code as currently written, inaccuracies due to rounding errors are ignored. Rewrite the routine to transform the image to a 16-bit color space, and use a 32K color lookup table rather than a 256-byte table, for the contrast adjustment; then transform the image back to its original color space afterwards.
reade more... Résuméabuiyad

Fast conversion of bitmaps to SVG


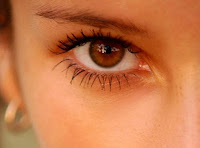
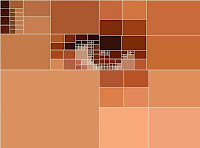
The image on the left is the 600x446-pixel "original" RGB image; the copy on the right has been tiled into 6706 solid-filled rectangles. See text for discussion.

Conversion of bitmapped images (*.jpg, *.gif, etc.) to vector format (Postscript, SVG) is, in general, a Difficult Problem. In some ways, it's not unlike trying to convert spoken text (in the form of *.mp3 audio) to ASCII. Well okay, maybe it's not that bad, but it's gnarly. You're trying to parse precise geometric shapes out of an ensemble of intensity samples. It's not at all obvious how to do it. Finding a fully general algorithm for describing an arbitrary bitmap as an ensemble of vector-drawable shapes is vexingly difficult. You might as well try to reassemble Yugoslavia.

You have to admit, though, it'd be darned handy to be able to transcode a bitmap image into (say) some flavor of XML (such as SVG). Unlike binary formats, XML is wire-protocol-friendly, queryable at the element and attribute level, transformable using XSLT (and/or E4X, or other technologies), human-readable (bwahhh-ha-ha . . .), and highly compressible. Converting JPEG to XML would open the door (potentially) to many interesting operations. Imagine running XPath queries against images to find specific areas of interest, or morphing one image into another using XSLT.

While there is obviously no one right way to proceed, I'd like to propose an approach to the problem (the problem of how to transcode bitmaps to SVG) based on quadtree decomposition of an image into polygons -- rectangles, in particular. It's possible to apply the same approach using triangles as primitives, instead of rects, or spline patches for that matter, but rectangles offer some noteworthy advantages. Most images are rectangles to begin with, of course, and parsing them into smaller (but adjoining) rects is a natural thing to do. Once parsed, rects allow a relatively compact representation; and at render-time, not many solid shapes are easier or faster to draw.

We have the considerable advantage of being able to start from the perspective of seeing a bitmapped image as just a grid of one-by-one rectangles (known as pixels). Two adjoining pixels of the same color become a 1x2 solid-color rect, four adjoining identical pixels become a 2x2 or 1x4 rect, and so on. Surely we can parse out the "naturally occurring" solid-filled rects within a pixel lattice? Those rects are instantly vector-drawable.

If we do this, we'll get what we get -- probably a very small handful of accidental finds. But we can do better, if (through preprocessing) we quantize pixel values in such a way as to force nearly-equal pixels to be equal in value. This will cause the appearance of a higher percentage of solid-color rects within a bitplane. Of course, when we're done, there's still no guarantee we will have covered the entire visual plane with rects (unless, as I say, we count individual pixels as 1x1 rects). Nevertheless, it's an interesting strategy: Force adjoining almost-equal pixels to be equal in value, then aggregate them into solid-color rects. Deal with the leftovers later.

At the extreme, we can look at the entire image as being a collection of pixels that are nearly equal in value. There is actually considerable variance in pixels, of course (unless the image is truly not very interesting). But what we might do is quantify the variance in some way, and if it exceeds a threshold, divide the image into daughter rects -- and begin again. We know that eventually, if we keep subdividing, we'll get to individual pixels (1x1 rects) that have zero variance within themselves. By this sort of strained logic we might convince ourselves that there should be less variance in small rects than in large ones, as a general trend.

Let me get right to it and propose an algorithm. (Listen up.) Start by considering a rectangle covering the whole image. Going pixel by pixel, calculate some variance measure (such as root-mean-square variation from average) for all pixels, for the whole region. If the variance is low (lower than some arbitrary limit), consider all pixels within the region to be equal; define the region as a rect of color Argb (representing the arithmetic average of the pixel values). If the variance exceeds an arbitrary threshold, subdivide the image. Specifically, subdivide it into four (generally unequal) rects.

To determine where to subdivide, calculate the "center of gravity" of the parent rect. A pixel's lightness or darkness, multiplied by its position vector, gives its moment-in-X and moment-in-Y. Add all the X moments together (and the Y moments). Divide by the number of pixels. The result is the visual center of the region. That's where you divide.

Repeat the procedure on newly created rectangular regions. Any regions with low variance can be rendered as a solid-color rect; the other regions are subdivided, and the algorithm continues until reaching individual pixels, or until every region larger than a pixel was successfully encoded as a rect.

This general technique is known as quadtree subdivision and it lends itself well to recursive implementation. You're not likely to get into stack-overflow problems with it, because with four times as many rects at each recursion cycle, you'll have created (potentially) over 1000 rects in just 5 cycles. Ten levels deep, you've created a million rects. Better start worrying about heap, not stack.

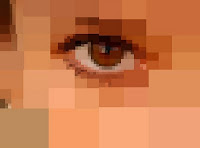
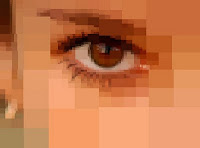
A demonstration of the technique can be seen below. The image on the left was created using a fairly "insensitive" variance threshold of 29 (meaning that subdivision did not occur unless a region had an RMS variance of at least 29, out of a possible range of pixel values of 0..255). Because subdivision happened infrequently, only in the very noisiest of pixel regions, smaller rects tended to cluster in areas of high detail (high variation in pixel intensities), such as around the edges of the iris and eyelashes. The image on the right shows that with the RMS threshold set lower (at 22), we get more detail -- about 300 rects total. (White outlines around the rects have been omitted on the right image.)


The image on the left has been parsed into 136 solid rectangles (with white outlines for illustrative purposes) using the recursive quadtree decomposition described in the text. Notice how subdivision into smaller rectangles tends to coincide with areas of high detail. The image on the right has been parsed into 334 rects.

The algorithm is tunable in a couple of ways. The most obvious way is via the variance-cutoff parameter. If the variance threshold is set low, it means that the slightest bit of "noise" in a given region will trigger subdivision of the region (and continued operation of the algorithm). However, we have to stop subdividing before reaching individual pixels. So another tuning variable is the minimum tile size.


The image on the left is a collage of 790 solid-filled rectangles. At a rect count of 2209, the image on the right is starting to have a bitmap-like feel.

The code that produced these images consists of 200 lines of JavaScript (shown below) and another 200 lines of Java utility routines (in a class called ImageUtilities: see further below). In addition to that, you need the ImageMunger Java application that I described in yesterday's post (yet another 200 lines or so of Java). First, the JavaScript:

// tiles.js
// Kas Thomas
// 23 January 2010
//
// Public domain.
//
// Note: For this to work, you need the ImageMunger
// Java app at http://3.ly/UBp
// You also need the ImageUtilities class described
// at the same blog.

// ------------------ RECURSIVE SUBDIVISION -------------------
function quadRecurse( ar, rect ) {

if ( !isDivisible( rect ) ) {
ar.push( rect );
return;
}

var newRects = quadDivide( rect ); // partition rect

for (var i = 0; i < newRects.length; i++) // size check
if (newRects[i][2] < 1 || newRects[i][3] < 1) {
ar.push(rect);
return;
}

for (var i = 0; i < newRects.length; i++) // recurse on each new rect
quadRecurse( ar, newRects[ i ] );
}

function quadDivide( rect ) {

var pixArray = getPixArrayFromRect( rect );

// Get the visual "center of gravity" of the image
var cg = Packages.ImageUtilities.getCG( pixArray, rect[2] );

cg[0] = (cg[0] + .5) * .5;
cg[1] = (cg[1] + .5) * .5;
cg[0] = 1.0 - cg[0];
cg[1] = 1.0 - cg[1] ;

var centerx = ( (cg[0] * rect[2]) & 0xffff);
centerx += rect[0];
var centery = ( (cg[1] * rect[3]) & 0xffff);
centery += rect[1];

var widthToCenterx = centerx - rect[0];
var heightToCentery = centery - rect[1];

var rect1 = [ rect[0], rect[1], widthToCenterx, heightToCentery ]; // UL
var rect2 = [ rect[0], centery, widthToCenterx, rect[3] - heightToCentery]; // LL
var rect3 = [ rect[0] + widthToCenterx, rect[1], rect[2] - widthToCenterx, heightToCentery ]; // UR
var rect4 = [ rect[0] + widthToCenterx, centery, rect[2] - widthToCenterx, rect[3] - heightToCentery ]; // LR

return [ rect1, rect2, rect3, rect4 ];
}

// -------------- divisibility ----------------
function isDivisible( rect ) {

if (rect[2] < WIDTH_THRESHOLD || rect[3] < HEIGHT_THRESHOLD)
return false;

var pixArray = getPixArrayFromRect( rect );
var rms = Packages.ImageUtilities.getRMSError( pixArray );

if (rms < RMSERROR_THRESHOLD)
return false;

return true;
}

function getPixArrayFromRect( rect ) {

var sub = Image.getSubimage( rect[0],rect[1],rect[2],rect[3] );
return sub.getRGB(0, 0, rect[2], rect[3], null, 0, rect[2]);
}

// -------------------- RENDER ---------------------------------------
function render( ar ) {

var g2d = Image.createGraphics();
var r = null; var sub = null; var pixels = null;
var color = null;

for (var i = 0; i < ar.length; i++) {
r = ar[i];
if (r[2] <= 0) continue; // r[2] = 1;
if (r[3] <= 0) continue; //r[3] = 1;

pixels = getPixArrayFromRect(r);
color = Packages.ImageUtilities.getAverageAWTColor( pixels );

g2d.setPaint( color );
g2d.fillRect( r[0], r[1], r[2], r[3] ); // FILL SOLID

if (OUTLINES == true) {
g2d.setColor( java.awt.Color.WHITE );
g2d.drawRect( r[0], r[1], r[2], r[3] );
}
}

Panel.updatePanel();
}

// -------------------- WRITE SVG ----------------------
function writeSVG( preamble, destfile, ar ) {
var r = null; var pixels = null; var awt = null;
var color = null;

var output =
'<?xml version="1.0" encoding="UTF-8" standalone="no"?>'+
'\n<!DOCTYPE svg PUBLIC "-//W3C//DTD SVG 20010904//EN" ' +
'"http://www.w3.org/TR/2001/REC-SVG-20010904/DTD/svg10.dtd">' +
'<svg xmlns="http://www.w3.org/2000/svg" ' +
'xmlns:xlink="http://www.w3.org/1999/xlink" ' +
'viewBox="0 0 640 480" ' +
'xml:space="preserve" ' +
'width="680px" ' +
'height="560px">';

output += "<g transform=\"scale(.85)\">";

for (var i = 0, r = null; i < ar.length; i++) {
r = ar[i];
pixels = getPixArrayFromRect(r);
awt = Packages.ImageUtilities.getAverageAWTColor( pixels );

color = awtColorToHex( awt );

output += outputSVGRect( mainArray[i], color );
}
output += "</g>";
output += "\n</svg>";

// write output to file
Packages.ImageUtilities.saveStringToFile(output, destfile);
}

function intToHex( num ) {
num *= 1;
hexStr = '000000' + (num).toString(16);
while ( hexStr.length > 6)
hexStr = hexStr.substring(1);

return "#" + hexStr;
}

function awtColorToHex( awt ) {
var theInt = (awt.getRed()<<16)|(awt.getGreen()<<8)|awt.getBlue();

return intToHex( theInt );
}

function outputSVGRect( r, color ) {

var str = "<rect x=";
str += "\"" + r[0] + "\" ";
str += "y=\"" + r[1] + "\" ";
str += "width=\"" + r[2] + "\" ";
str += "height=\"" + r[3] + "\" ";
str += "fill=\"" + color + "\" ";
str += "stroke=\"" + color + "\" ";
str += "/>\r";

return str;
}

// ---------- Main work routine ------------
// Usage:
//
// doQuadding( 10, 6, "svg", "C:/test1.svg" );
// (writes output to an SVG file)
//
// or:
//
// doQuadding( 11,4, "preview", null );
// (renders image in JFrame)

function doQuadding( rms, sizeLowLimit, mode, dest ) {

if (Image == null) {
java.lang.System.out.println("Nothing to do; no source image." );
return;
}
w = Image.getWidth(); h = Image.getHeight();
mainRect = [ 0,0,w,h ];
mainArray = new Array();

RMSERROR_THRESHOLD = rms;
WIDTH_THRESHOLD = HEIGHT_THRESHOLD = sizeLowLimit;

quadRecurse( mainArray, mainRect ); // *** RECURSE ***

java.lang.System.out.println("Total rects: " + mainArray.length );

if (mode.toLowerCase().indexOf("preview") != -1) {
java.lang.System.out.println(" rendering... " );
render( mainArray );
}
if (mode.toLowerCase().indexOf("svg") != -1) {
java.lang.System.out.println(" writing... " );
writeSVG( "c:/temp/svgStub.txt", dest, mainArray);
java.lang.System.out.println("DONE.");
}
}

OUTLINES = false;
var start = 1 * new Date;
// Actually call the entry point (begin processing):
doQuadding( 8,6, "preview", null );
// doQuadding( 8,6, "svg", "c:/temp/test86.svg" );
var end = 1 * new Date;
java.lang.System.out.println("Finished in " + (end-start) +
" milliseconds");

To use this file, give it a name like tiles.js, then run ImageMunger (the Java app I described in yesterday's post) from the command line, passing it the name of the image you want to modify, and the name of the script file:

> java ImageMunger myImage.jpg tiles.js

The entry point for the script is doQuadding(), which you can call with a 3rd argument of "svg" if you want to write output to a Scalable Vector Graphics file. Otherwise pass a 3rd arg of "preview" and ImageMunger will simply render the transformed image to a JFrame.

The script makes reference to a number of utility routines written in Java. The utility routines are in a class called (what else?) ImageUtilities, as follows. The routines should be fairly self-explanatory.

import java.io.BufferedReader;
import java.io.File;
import java.io.FileOutputStream;
import java.io.FileReader;
import java.io.IOException;
import java.io.OutputStream;

/*
ImageUtilities.java

Kas Thomas
23 January 2010
See http://3.ly/UBp and subsequent posts.
*/


public class ImageUtilities {

public static void saveStringToFile( String content,
String outpath ) {

OutputStream out = null;
try {
out = new FileOutputStream(outpath);
out.write(content.getBytes());
} catch (IOException e) {
System.out.println("Couldn't save to " + outpath);
e.printStackTrace();
} finally {
try {
if (out != null)
out.close();
} catch (IOException e1) {
e1.printStackTrace();
}
}
}

// Get the visual center-of-gravity of a pixel array.
// Pass the array and the raster width.
public static double [] getCG(int [] pix, int w) {

double intensity = 0;
int red = 0;
int green = 0;
int blue = 0;
double [] cg = { 0,0 };
double averageIntensity = 0;
int pvalue = 0;

for (int i = 0; i < pix.length; i++ ) {
pvalue = pix[i];
red = ((pvalue >> 16) & 255);
green = ((pvalue >> 8) & 255);
blue = pvalue & 255;
intensity = ((double)(red + blue + 2 * green))/1024.;
averageIntensity += intensity;
cg[0] += intensity * (i % w);
cg[1] += intensity * (i / w);
}

cg[0] /= averageIntensity;
cg[1] /= averageIntensity;

cg[0] /= w;
cg[1] /= pix.length/w;
return cg;
}

public static double getRMSError( int [] pix ) {

double accumulator = 0;
double diff = 0;
double aveIntensity = 0;
double rms = 0;
int len = pix.length;

for (int i = 0; i < len; i++) {
aveIntensity += (double)((pix[i] >> 8) & 255);
}

aveIntensity /= len;

for (int i = 0; i < len; i++) {
diff = (double)((pix[i] >> 8) & 255) - aveIntensity;
accumulator += diff * diff;
}

rms = accumulator/len;

return Math.sqrt(rms);
}

public static java.awt.Color getAverageAWTColor( int [] input ) {

int ave = getAverageColor( input );
int red = (ave >> 16) & 255;
int green = (ave >> 8) & 255;
int blue = ave & 255;
return new java.awt.Color(red,green,blue);
}

public static int getAverageColor( int [] input ) {

int red = 0;
int green = 0;
int blue = 0;
int pvalue = 0;
int averageRed = 0;
int averageGreen = 0;
int averageBlue = 0;

int len = input.length;

for (int i = 0; i < len; i++) {

pvalue = input[i];
red = ((pvalue >> 16) & 255);
green = ((pvalue >> 8) & 255);
blue = pvalue & 255;

averageRed += red;
averageGreen += green;
averageBlue += blue;

}

averageRed /= len;
averageGreen /= len;
averageBlue /= len;

return (averageRed << 16) | (averageGreen << 8) | averageBlue;
}

public static double getIntensity( int pvalue ) {

int red = ((pvalue >> 16) & 255);
int green = ((pvalue >> 8) & 255);
int blue = pvalue & 255;

double intensity = red + blue + 2 * green;

return intensity/1024.;
}

public static double getIntensity( java.awt.Color c) {

int intvalue = c.getRed() << 16;
intvalue += c.getGreen() << 8;
intvalue += c.getBlue();
return getIntensity( intvalue );
}

public static java.awt.Color getAWTColor( int pvalue ) {

int red = ((pvalue >> 16) & 255);
int green = ((pvalue >> 8) & 255);
int blue = pvalue & 255;

return new java.awt.Color(red,green,blue);
}

public static double getRMSE( int [] pix1, int [] pix2) {

double rms = 0;
double accum = 0;
double intensity1 = 0;
double intensity2 = 0;
double tmp = 0;

if (pix1.length != pix2.length) {

System.out.println("Arrays are not the same size.");
return rms;
}

for (int i = 0; i < pix1.length; i++) {
intensity1 = getIntensity( pix1[i] );
intensity2 = getIntensity( pix2[i] );
tmp = intensity1 - intensity2;
tmp *= tmp;
accum += tmp;
}

rms = accum/pix1.length; // the mean of the squares
return Math.sqrt( rms ); // root mean square
}
}

Even though the main routine is in JavaScript, the overall processing runs quickly. The algorithm executes in near-linear time and can output around 5000 rectangles per second (to screen, that is; disk I/O not included).

Projects for the future:
  • Write gradient-filled rects instead of solid-filled rects, choosing the gradient endpoint colors in such a way as to minimize the differences between the output and the original image.
  • Given two SVG images, each an ensemble of rects (preferably equal in number), write a transformation routine that morphs one image into the other via transformations to the individual rects (and their colors). Store the second image as simply an ensemble of transformations (no rects). The first image provides the "reference rectangles" that will be transformed.
  • Write a public key image-encryption routine based on the foregoing notion, such that Image A becomes a key that someone can use to encrypt Image B, with private-key Image C unlocking B.
  • Instead of writing an SVG image as an ensemble of individual rects, write it as one rect that is repeatedly resized and repositioned via successive affine transformations.
  • Encrypt an image using the above technique (rewrite one rect many times through transformation) in concert with matrix hashing. Write an SVG image-encryption routine whose difficulty of decryption depends on the non-commutative nature of matrix multiplication and the numerical instability of inverted matrices.
  • Write a "chunky JPEG" routine that essentially uses the quadtree decomposition to chunk the image prior to discrete cosine transformation, instead of using the (canonical JPEG) 8x8 chunking.
  • [ Insert your own idea here! ]
reade more... Résuméabuiyad

A simple Java class for running scripts against an image

I like to do a bit of 2D and 3D graphics programming in my spare time. The trouble is, Java gets a bit heavy at times, and I look for ways to test new ideas quickly. Testing ideas quickly means scripting. But how do you get at pixel values with JavaScript?

The answer is, you write a super-simple Java class that can load an image and hand off pixels to the JavaScript context. The following is such a class.
/*
ImageMunger
Kas Thomas
http://asserttrue.blogspot.com/

Public domain code.

All it does is open an image, display it in a window,
and run a script file. Usage:

ImageMunger myimage.jpg myscript.js

The JavaScript file will (at runtime) have two global variables,
Panel and Image, in scope. They correspond to the
ImagePanel inner class instance and the BufferedImage
that's displaying in the panel. That way, your script
can easily manipulate the image and/or the panel.

*/

import java.awt.Graphics;
import java.awt.image.BufferedImage;
import java.io.BufferedReader;
import java.io.File;
import java.io.FileOutputStream;
import java.io.FileReader;
import java.io.IOException;
import java.io.OutputStream;
import javax.imageio.ImageIO;
import javax.swing.JComponent;
import javax.swing.JFrame;
import javax.script.ScriptEngine;
import javax.script.ScriptEngineManager;

public class ImageMunger {

// This inner class is our canvas. We draw the image on it.
class ImagePanel extends JComponent {

BufferedImage theImage = null;

ImagePanel( BufferedImage image ) {
super();
theImage = image;
}

public BufferedImage getImage( ) {
return theImage;
}

public void setImage( BufferedImage image) {
theImage = image;
this.updatePanel();
}

public void updatePanel() {

invalidate();
getParent().doLayout();
repaint();
}

public void paintComponent( Graphics g ) {

int w = theImage.getWidth( );
int h = theImage.getHeight( );
g.drawImage( theImage, 0,0, w,h, this );
}
} // end ImagePanel inner class

// We need to keep a reference to the ImagePanel:
public ImagePanel theImagePanel = null;

// Constructor
public ImageMunger( String [] args ) {

parseArgs( args );

// open image
BufferedImage image = openImageFile( args[0] );

// create window
theImagePanel = new ImagePanel( image );
JFrame gMainFrame = new JFrame();
gMainFrame.setTitle( args[0] );
gMainFrame.setBounds(50,80,
image.getWidth( )+10, image.getHeight( )+10);
gMainFrame.setDefaultCloseOperation(3); // dispose
gMainFrame.getContentPane().add( theImagePanel );
gMainFrame.setVisible(true);

}

ImagePanel getImagePanel( ) {

return theImagePanel;
}

BufferedImage openImageFile( String fname ) {

BufferedImage img = null;

try {
File f = new File( fname );
img = ImageIO.read(f);
}
catch (Exception e) {
showMessage("Trouble reading file.");
e.printStackTrace();
}

return img;
}

public static void runScriptFromFile( String fileName,
ScriptEngine engine ) {

try {
engine.eval(new java.io.FileReader( fileName ));
}
catch( Exception exception ) {
exception.printStackTrace();
showMessage( exception.getMessage() );
}
}


public static void showMessage(String s) {
javax.swing.JOptionPane.showMessageDialog(null, s);
}

void parseArgs( String[] args ) {

if ( args.length < 2 )
tellUserHowToUseThisApp( );
}

void tellUserHowToUseThisApp( ) {
showMessage( "Supply an image file name and a script file name." );
}

// main()
public static void main( String[] args ) {

ImageMunger munger = new ImageMunger( args );

// create a script engine manager & engine
ScriptEngineManager factory = new ScriptEngineManager();
ScriptEngine engine = factory.getEngineByName("JavaScript");

engine.put( "Image", munger.getImagePanel( ).getImage( ) );
engine.put( "Panel", munger.getImagePanel( ) );
engine.put( "args" , args );

// evaluate JavaScript code from file
runScriptFromFile( args[1], engine );
}
}

This Java app does two things, based on arguments provided on the command line. First, it opens an image of your choice (you supply the file path as the first command-line arg) in a JFrame. Secondly, it opens and executes the JavaScript file whose path you supply as the second command-line argument.

Before executing the script, the Java app puts two variables, Image and Panel, into the JavaScript runtime scope. (These are references to the BufferedImage object, and the JComponent that renders it, respectively.) That way, it's easy to manipulate the image and/or its JComponent at runtime, using script.

Here's an example. Suppose you want to convert a color JPEG into a grayscale (black and white) image. You would write a script like the following and put it in a .js file on disk. Then run the ImageMunger app and have it execute the script.


// desaturate.js
// Converts RGB image to grayscale
.

( function desaturate( ) {

if (Image == null) {
java.lang.System.out.println("Nothing to do; no source image." );
return;
}

var w = Image.getWidth();
var h = Image.getHeight();
var pixels = Image.getRGB( 0,0,w,h,null,0,w );
var tmp;

for ( var i = 0; i < pixels.length; i++ ) {

// get Green value
tmp = 255 & (pixels[ i ] >> 8);

// set Red, Green, and Blue channels the same
pixels[ i ] = (tmp << 16) | (tmp << 8) | tmp;
}

Image.setRGB( 0,0,w,h,pixels,0,w );
Panel.updatePanel( );
} ) ( );

No real magic here. The script just grabs pixels from the BufferedImage (via the Image global that we put into the JS scope), converts all pixels in the image to monochrome RGB values, stuffs the pixels back into the image, and requests a redraw of the ImagePanel (using the Panel global).

No rocket science. Just quick-and-dirty pixel banging. Perfect if you're into peeking and poking pixels late at night but like to avoid getting Java under your fingernails just before climbing into a clean bed.
reade more... Résuméabuiyad

NASA's One-Man Stealth Copter


Over the years, there've been plenty of store-it-in-your-garage one-man "personal helicopter" designs (most of which never flew, of course). It's pretty much been sci-fi until now -- and still is -- but this design from NASA's Langley Research Center in Hampton, VA actually looks plausible. Watch the video and decide for yourself.

The Puffin, to be unveiled on January 20 at an American Helicopter Society meeting in San Francisco, is a 3.7-meter-long, 4.1-meter-wingspan craft made of carbon-fiber composites, denting the grass at an empty mass of 135 kilograms, not including 45 kilograms of rechargeable lithium phosphate batteries.

Unfortunately, you won't get far in the Puffin: the endurance (with current battery technology) is less than half an hour. (And of course, the whole thing is just CGI at this point. No prototype has been built, much less flown.) But it looks as if it could actually survive an episode of MythBusters. Which is more than you can say for certain other one-man pocket rockets.
reade more... Résuméabuiyad

Greasemonkey security fix broke your scripts? Here's what to do


New security settings in Greasemonkey.

Not long ago, I upgraded Firefox, and in the process of doing so I upgraded to the latest versions of a bunch of Firefox extensions (including Greasemonkey). And of course, things started breaking.

Some of my favorite Greasemonkey scripts (including scripts that I wrote to help me manage my Twitter account) stopped working. After a certain amount of hair-pulling and cursing, I managed to find and fix the problem, so I thought (inasmuch as this particular script-breakage problem is happening to other people as well) I would post the cure here.

Back in September, the Greasemonkey dudes (Anthony Lieuallen, Aaron Boodman, Johan Sundström) decided to "improve security by limiting injection scope." What it means is that they decided to disallow scripts that target URLs with non-HTTP schemes. In other words, a script that targets "file://something" no longer works (by default) in the new Greasemonkey, whereas scripts that target "http://something" of course still work. The reason non-http schemes were disallowed is that people were writing evil scripts that target "about:cache" (a special URL in Firefox that exposes your cached data). Not good.

But on the other hand, Greasemonkey scripts that target "file:" URLs are incredibly useful. You can create an HTML form (constituting the UI for an app), stick it on your local disk somewhere, have it trigger a GM script, and that script (in turn) can do cross-site AJAX and all manner of lubed-simian legerdemain behind the scenes, in service of some kind of business (or other) logic that wouldn't be possible any other way. It's truly a wonderful capability.

The problem is, Greasemonkey doesn't allow it any more -- by default. But fear not. The Greasemonkey dudes have included a new config setting that lets you defeat the new security measure. What you have to do is hand-type "about:config" in the Firefox address bar, then search (filter) on "greasemonkey.fileIsGreaseable" (note the spelling; careful not to type "fileIsGreasable"). Set the resulting value to true. See the screenshot posted above.

Note that there is another new config setting (as in the screenshot) for enabling the targeting of "about:" URLs.

Now if only I could solve this issue for Chrome. Lately I've been porting certain of my Greasemonkey scripts to the Google browser, and for the most part that's been working fine, but I notice Chrome doesn't honor "file:" target URLs even when you set your GM script to a target of "*" (all URLs). If anyone knows a workaround (scamper-around? What do you call a workaround for greased monkeys?), fling me a banana, will you?
reade more... Résuméabuiyad

Identity Hijinks, Sponsored by Novell

This one baffles me. A friend pointed out to me that Novell, a company "with over 20 years of experience in identity and security," a company that in fact specializes in identity management, has been named a Bronze Sponsor of SYS-CON's 5th International Cloud Expo.

Why is that so hard to believe? Simply because SYS-CON is a company that spoofs the identities of its writers and writes stories that hype supposed takeover targets.

I know of one case, in particular, where a SYS-CON reporter's identity is fake. That would be the identity of the reporter (avatar) known as Yeshim Deniz. It turns out Yeshim Deniz is actually a stock photo called "Friendly Smile." However, that doesn't keep Yeshim from hyping TIBCO stock in a SYS-CON year-end prediction blog. The blog (which was widely read by amateur investors; see, e.g., the Yahoo stock message boards) says TIBCO will be acquired by IBM shortly.

SYS-CON "reporter" Yeshim Deniz

Coincidentally, SYS-CON happens to publish an online magazine called NOW Magazine. Tibco's Marketing VP Ram Menon is the "Publisher" of NOW Magazine.

Does anyone else smell that odor?

The story about Novell becoming a Bronze Sponsor of Cloud Expo was written by SYS-CON reporter (avatar?) Elizabeth White. Oddly, though, Elizabeth White's head shot is named "Susan Ulitzer headshot.bmp".

When a better reporter than I am gets to the bottom of all this, maybe we'll get an explanation for some of this chicanery that makes sense. Right now, it's making no sense to me. What I see is a company that puts fake names and fake photos over reporter bylines, in order to hype things like TIBCO stock and "Cloud Expo." Maybe I'm missing something, but it all looks like fraud to me. I think that's a reasonable opinion. Don't you?

In the meantime: Novell, shame on you for sponsoring identity chicanery. You really don't need this right now.
reade more... Résuméabuiyad

How to get 348,946 unique page-views per year for your blog


Above: Traffic for top 40 assertTrue() blog posts of 2009. Vertical scale: 210 readers per pixel. (Graphic courtesy of Google Charts.)

By now it's somewhat traditional, if you're a self-indulgent blowhard who blogs (not that I personally know any such individuals, of course), to cap off a year of blogging with an analysis of "ten most popular posts for the year," or some such. Examples of such fluff abound in the blogosphere.

Far be it from me to tamper with tradition.

It turns out, 2009 was a good traffic year for the assertTrue() brand. In all, some 240,483 unique visitors from 185 countries made 329,954 visits to this blog, establishing just under 349,000 unique page views.

Of the 330K-or-so visits to this blog, 175K were from people in the U.S. (I would have thought this number would be much higher.) The top nine countries of origin after that were (in order) the U.K., Canada, Germany, Australia, India, Netherlands, France, Sweden, and Spain. I thought it interesting that the Netherlands, with 5,456 visits, sent more eyeballs than France (with 5,383). Thank you, Adriaan, for hitting Refresh.


The Top Ten

What the heck were people reading? Mostly just a handful of high-traffic posts; see the classic longtail traffic graph above.

The Top Ten assertTrue( ) posts for 2009 (in order of popularity) were:

1. (82,170 visits) One of the toughest job-interview questions ever
It didn't take people long to figure out that the company in question (whose name I cannot mention) starts with 'G', ends with 'e', and rhymes with frugal. This post literally swept the globe, bringing 67,607 new visitors (and over 14,000 return visitors) to my blog from an astonishing 160 countries. Incredibly, these tens of thousands of people spent an average of 4:40 on the page (meaning, many of them read as slowly as I do; praise them all). Most of the traffic came by way of reddit.com, but I owe a debt of gratitude to Tom Kyte for discussing the post (thoughtfully and in depth) in his own excellent blog, which sent 3,000+ visitors my way. Thank you, Tom.

2. (47,591 visits) How to write fast code
Although this post was only half as long as the one above, visitors spent 22% more time on the page, which means, obviously, a lot of people fell asleep sitting up.

3. (18,484 visits) Developers should not be allowed to work overtime
This post resulted in the most time-on-page of any in the Top Ten. Draw your own conclusions.

4. (11,314 visits) Making one line of code do the work of 47
Programmers (good ones, that is) are lazy and like to find smart ways to work. Apparently, quite a few coders liked this writeup of John K. Ousterhout's classic paper on scripting languages.

5. (10,474 visits) NoSQL Required Reading
When Tim Bray saw this post, he accused me of "fine NoSQL link curatorship" (whatever that is). Traffic went through the roof.


Tim Bray

6. (9,350 visits) Here's what Opera is about to unveil
Folks, I don't know what Opera is about to unveil any more than I know what's under the Pope's kimono.

7. (9,166 visits) Twice-as-fast isn't good enough
If any trend should be apparent by now, it's that programmers are suckers for two types of articles: namely, articles on writing faster code, and on writing code faster.

8. (8,281 visits) Two techniques for faster JavaScript
See 2, 4, and 7 above. Speed is king.

9. (7,658 visits) Java as Legacy Language
Okay okay. Java isn't a dead language. No more than Latin, at least.

10. (6,692 visits) The role-based favicon, and why Novell patented it
This is the blog post that brought out the death threats and foul-tongued remarks from chest-thumping bigots. I'll remember it always, with fondness.


The Secret to Generating Traffic

So, what's the secret to generating traffic for your blog? It's very simple: Write stuff that appeals to programmers (preferably articles having to do with making code appear to run faster; either that, or job-interview questions from the big search companies), make sure your stuff gets picked up by Reddit, Tom Kyte, or Tim Bray, and -- most important of all -- just plain write a lot. Altogether, I wrote 170 posts here last year (plus 40 more for my employer, plus another half dozen for Offtopic). Lay down lots of seed; flowers will appear. Or in my case, lay down a spitload of fertilizer, and stand back. Far enough back for the smell not to get into your clothing.
reade more... Résuméabuiyad